For those of you Tumblrs out there, this is one trick that will come in great handy. For the rest of you, a .gif (pronounced “jiff”) file is a Graphics Interface File. Its most common appeal is the slideshow feature. Within a single image file, a Gif can make several images become a short muted video clip that loops on forever.
I recently made a Gif for a friend of mine who is making a short film called “The Train”. I highly recommend you check out the film’s website here. For the sake of demonstration, I’ll be using the Gif that I created for him to explain how you can make one yourself.

Before we start you will need a few things.
A. A short series of image files to turn into a Gif. Depending on the sizes of each, you normally want to use no more than 14 or 15 at most. You CAN use as many as you would like, but most websites won’t allow uploads larger than about 1 MB.
B. Adobe Photoshop. I will be using version CS6. I know that CS5, CS4, and CS3 will all operate almost identically for this function but past that, I cannot speak from experience. If you don’t have Adobe Photoshop and you get some sick thrill out of breaking the law, you can download the cracked version that I use here. Otherwise, kudos for being a good citizen.
C. A web destination. I’ll be using ImageShack, mainly because it’s the fastest, easiest and free. I highly recommend it for storing Gifs online.
Now that you have your supplies, let’s get Giffing.
1. Open up Adobe Photoshop and in your top menu bar select File>Scripts>Load Files into Stack… You’ll be met with a box looking like this one.

You’ll want to hit “Browse…” and locate your series of image files. Once you’ve located and selected them all, they will appear in the “Load Layers” box. Just hit “OK”.
2. You should now see all of your images stacked as layers within your workspace. Head back to the top menu and hit “Window”. This will bring up a large list of available windows for your workspace. Make sure that “Timeline” has a check next to it. If not, click it. You should then see a bar across the bottom of your workspace like this. 3. As you can see in the above image, there is a small Menu button at the top right corner of the “Timeline” window. Click the button and select “Make Frames from Layers”. This will instantly make new frames in your Timeline that resemble each layer identically. Just for the heck of it, hit the Play button at the bottom of your Timeline. Often times, they will automatically be backwards. If they are, click that same little Menu button and hit “Reverse”. WHOOO!
4. Now you will want to set a speed for your Gif. To do this, (assuming all frames will be the same speed) click the first frame in the timeline, then hold the Shift key and click the last frame. This will select all frames. Then, on any of the selected frames click on the tiny drop-down arrow just below the frame in your timeline. It’s next to the “0 sec.”. Within this drop-down menu you can change the timing of your frames. This will vary for all cases. For my Gif, I’ll set mine to .10 seconds.
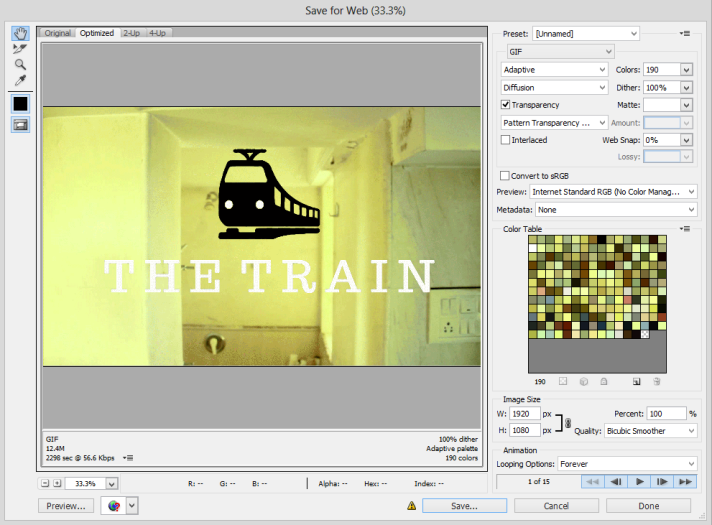
5. So, by this point, you should be ready to save your file and post it online. In order to save, click File>Save For Web… This will bring up a window looking like this.
 This part of the process is quite important and a bit complex. So let’s simplify! This window will help you to determine how high the quality of your Gif will be and how large the file will be. Just under the image, you see where it says 12.4 MB for me. It will be different for you. As I said before, ideally a gif is smaller than 1MB. So we will have to make some adjustments. I’ll list mine out.
a. Image Size – To the right underneath all of the color blocks, you can alter the height and width of the Gif which will drastically change the file size. This may be the only adjustment you need.
b. Colors – The top right drop-down box will allow you to choose the number of colors you want to have in your image. This will also greatly affect the file size. You can type in whatever number you want between 1 and 256.
c. Dither – This isn’t as effective, but can help. Using it increases quality, disabling it lowers quality and size.
D. Web Snap – I use this as a last resort. And I only go up to about 5% when I do. It just makes more pixels stand out. Lowers quality and file size as you increase %.
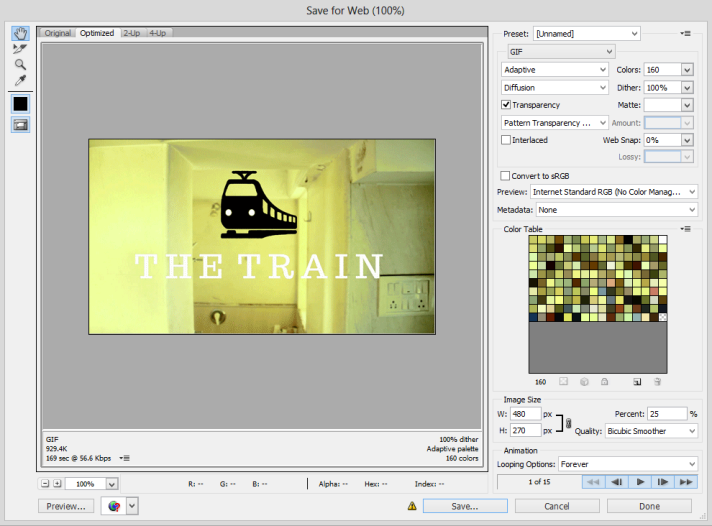
After making my corrections, my window looks like this.
6. Hit “Save”, and you have completed your Gif!
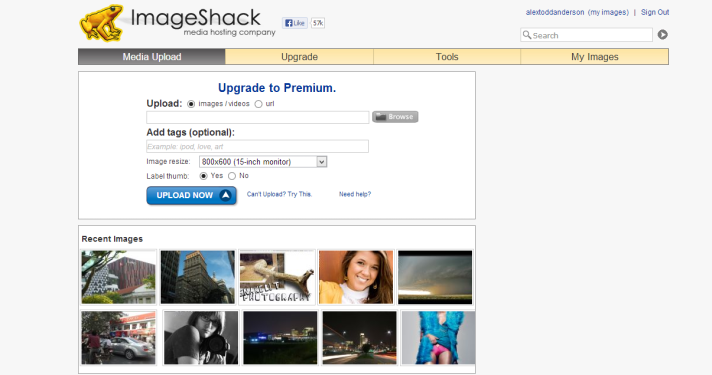
7. Head to Imageshack (or your image host of choice) and hit”Browse”.
 Locate your file, select it, then hit “Upload Now”. Normally, it will prompt you to create an account. I would just do it. It is free and fast. There’s no email verification or anything.
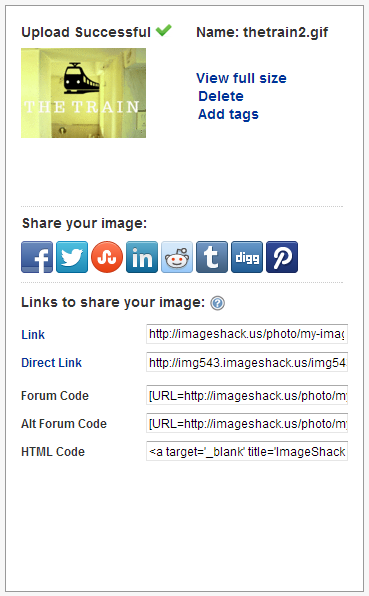
7. Once your image is done uploading you’ll be met with a box like this one.
 Depending on where you’d like to post your Gif, you can copy and paste the HTML (as I did earlier in this post), or you can send someone a direct link. If that’s too many buttons to press for you, Imageshack provides 8 top-dog social networks to share to instantly.
That’s it! You’re done in a Giffy. You have officially created, saved, uploaded and shared your first Gif image! Proud of your work? Leave it in the comments below!
Questions? Corrections? Lemme know!

thx dear